
 Long Stemmed Fabric Flowers
So the last few weeks have been overwhelmingly filled with busyness. And this week is no exception. Criminently this time of year always about does me in.
However I thought I'd pause and blog a little tutorial. All of the fabric flowers out in blog land just kill me. They are all so fabulous. I wanted to add a bit of fabric flower goodness to my studio. I've had these on the brain for quite some time and I finally got around to creating them. I think spring inspired me. So here's how they turned out…


1 dozen long stemmed fabric roses!
Now my studio is wearing a smile. Now If only I could keep it clean. Hmmm….
So here is how I made them.


1. Cut fabric (selvage to selvage) in 5" strips. (approximately 5"x 45" long strips).
2. Fold strips in half lengthwise (wrong sides together) and press. Your strip is now 2.5" x 45-ish"


3. Trim off selvage edges (finished edges).
4. Open up strip. Sew a gathering stitch along the pressed seam. Fold back into place.


6. At one end make what I'll call a tail. It's about one inch wide by at least 4 inches long. (See photo, because I'm dreadful at writing directions)


7. To make things easier, I then use the first one and place it on top of another strip and use it as a pattern to cut the scalloped edge. These don't need to be "perfect."


8. Now back to the sewing machine. Sew the open ends (scalloped edges) together. I like to use a contrasting thread, but you can do what ever you please. (FYI… I was silly and still had my machine set for a gathering stitch on the photo. I guess you could do that, but it looks better as a regular stitch. So disregard the stitch length in the photo).


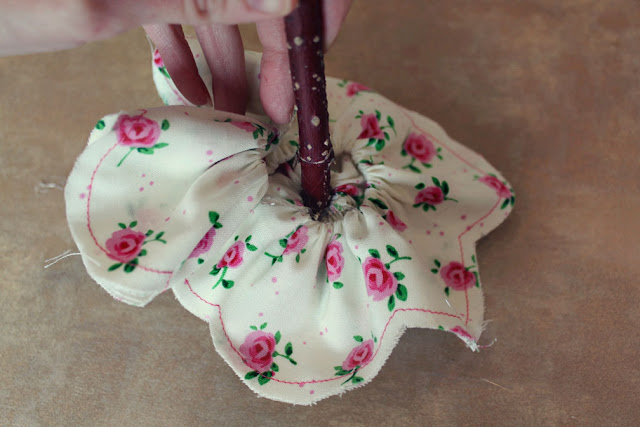
9. Now take your tail and tie it around the end of a stick. Make sure the end of the tail is pointing upward from the stick. (Not pointing downward). Again… see photo.


10. Now wrap the tail around the top of your stick. As you wrap come up at a strong angle, and then down in the opposite strong angle. This creates a "point." (Play with it before you actually glue it, so you make sure you get the right look, and so the end of the stick is completely covered). Glue in place. And there is the center of your rose!


11. Now carefully gather the remaining fabric. Be ginger with it, you don't want the string to break. Tie the thread together once gathered.


For a closed rose…
12.Have your glue gun handy. Add small dab of glue on stick and wrap the fabric around it. Repeat until you have wrapped the entire strip of fabric around the stick. (Try to keep the glue on the "inside" of the rose… so you don't have any showing).

For an open rose…

-Follow steps 1-11
12. With glue gun handy, add a glob of glue to the stick and wrap the fabric around the stick. Wrap the fabric 1 to 1.5 times around.
13. Now with your glue gun, pull a line of glue out from the stick, onto the fabric (about 1/2 inch… it's not a perfect science). Follow with your fabric. Hold in in place so glue dries. Then continue.


13. Now with your glue gun, pull a line of glue out from the stick, onto the fabric (about 1/2 inch… it's not a perfect science). Follow with your fabric. Hold in in place so glue dries. Then continue.


When you can see that you will have just enough to wrap the remaining fabric around the stem, tapper your glue line in towards the stem. Follow with the fabric. Then glue the last of the fabric tightly against the stem. And there is your open rose!


Lovely!
I experimented placing my roses in two different vases.
A classic cylinder vase.


And a long rectangle vase.
I'm crushing on the rectangle. I added extra sticks with fabric leaves. Perfect for the island/workspace in my studio.


Alright, so once upon a time I said if I'm making one I might as well make two and have a giveaway. It appears my offer still stands. So I'm giving away ...
1 Dozen Long Stemmed Fabric Roses
(Vase not included... you'll have to add that yourself;)
So leave a comment to enter. Let's see… if you don't know what to write, tell me your favorite flower.
1 Dozen Long Stemmed Fabric Roses
(Vase not included... you'll have to add that yourself;)
So leave a comment to enter. Let's see… if you don't know what to write, tell me your favorite flower.
I'll close the giveaway on sunday, and post the winner monday. Hooray for free stuff!
This giveaway is now closed;)
Update: I occasionally will have flowers like these for sale on etsy.
Here is a link ...
MY ETSY
Update #2: I have a tutorial for these without the stems... for a hair clip or brooch. Here is the link.
Roses without the stems.


I probably won't win being first...but somebody has to start! I love these flowers, Ang. Such a great idea.
ReplyDeleteThese are stunning! I love the scallops and the bright stitching. The leaves are adorable. I think you're right on for the rectangle vase. Great tutorial!!
ReplyDeleteYour fabric flowers are divine! My most favorite flower is the tulip with hydrangea coming in at a very close number two!
ReplyDeleteAnj, you kill me you are so darling. I could not make these in a million years!!! Where do you ever get such great fabric?
ReplyDeleteThe rectangle vase is fantastic - SO DANG CUTE! I'd love to win. :) My favorite flowers are lilacs, but who doesn't love roses?
ReplyDeleteOh, the rectangle for sure!! I kinda had a trist with Lilly's back in the 90's. But I think currently I'm in love with Daisies. Don't you think they are the friendliest flower?
ReplyDeleteWhat a fun giveaway! They are adorable! I love what you did with the rectangular vase and the leaves.
ReplyDeleteI just saw the award you gave me. Thank you!!!! You totally made my day. :)
Dang it Ang, if I could only have an ounce of your talent .... Love the rectangle set-up!
ReplyDeleteAnj, you know I love 'um! They look even better in person!
ReplyDeleteThese are way too cute! I love them in the rectangle vase. Thanks for the tutorial and the giveaway!
ReplyDeleteI can't even handle you! Quite amazing.
ReplyDeleteThese are so pretty...but I want to see that studio in detail!! It looks awesome!!! I get a craft room when we finish the basement and I am trying to come up with a plan of what I want.
ReplyDeletehi anj- lovely to see you back...hope all is good at your house...& that you have had a lovely long weekend...{i'm sure we are not the only ones enjoying 3 days with our kids??}...i adore the flowers...i was thinking of all the fabric pieces i could go and pull out and then i saw you had made soo many {!!} that you were giving them away...so i thought i'd have a cup of tea instead....& have another good look at yours- the fabrics are gorgeous- the leaves are lovely....i too would love to see the rest of *your* creative space...but sometimes you dont want to share everything....have a lovely week...
ReplyDeletemelissa x
Anj, these are simply stunning! I love the scallops. They just make me happy!!
ReplyDeleteFun giveaway! I'd love to win them to brighten up my studio... but I don't have one. But I know I could find a space to brighten them up with !:)
I love lavender tulips. So gorgeous!! Thanks so much for sharing this splendid tutorial!
~Alison
anji, you have outdone yourself. these are so cute. i feel dumb entering this giveaway (cause most 17 year olds don't read tons of blogs... but i do :) )- but they seriously would look so cute in my room. anywho... i like cala lilies.
ReplyDeletelove,
amanda
Those are SO CUTE!!! I have never seen any flowers like those! I LOVE the darling arrangement too! I am feeling inspired :) Love it!!!
ReplyDelete<3
Risa
Way to go Anj! I love the flowers--beautiful!
ReplyDeleteTiffany Cameron.
ReplyDeleteI am crossing my fingers that I will win this one! I absolutely love these flowers. I still need to come over sometime soon and hang out in your studio. Where have you been lady? I feel like I haven't seen you forever.
love ya!
Anj,
ReplyDeleteYou are amazing!!! Love these Flowers so much they would look so great in Paytons room. I totally love all flowers (i worked in a floral shop for 6 yrs) but if I had to pick one it would be Gardenia for sure... Thanks for sharing you are so talented..
Vicki
Beautiful. I love the little leaves, nice touch.
ReplyDeleteSo stinking cute!! Totally jealous of your creativity.
ReplyDelete"I carried a watermelon" (Dirty Dancing)
That is what I always feel like saying when I see other people's amazing talents.
My talents must be hidden pretty deep, cause they have yet to surface.
Thanks for sharing all your fun ideas.
Love ya
Teresa
WOW Anj! Before I even saw I had a chance to win a dozen of these lovelies I wanted to comment and tell ya how dang cute they are! GREAT job!
ReplyDeleteSeriously Anj...first look at how many people are reading your blog; you're like blogging royalty. After the wreath craft I had to make one, now you've given me my next project. Thanks!
ReplyDeleteThose are adorable! I don't really have a favorite flower, but just love flowers and those are perfect because they will last forever.
ReplyDeleteJust luuuurrrrvvvveee your flowers. So cute.
ReplyDeleteThose are DARLING! How do you come up with all of this stuff? Are you getting ready for a baptism this weekend too??
ReplyDeleteAnj darling flowers!! Love them.
ReplyDeleteI've seriously never won anything, even when I have a 1 and 4 chance of winning, but these are so darn cute, I've just got to try again. Delightful!
ReplyDeleteAnj! This is Jess Nordhoff ... I used to work with Jared ... anyways I found your amazing blog through a friend's and LOVE it!!! Seriously I wish I was crafty and talented like you are .... these flowers are to DIE for ... no joke! I want to win them so bad!!! Hope you guys are doing well!!
ReplyDeleteOh my goodness! This s amazing~ you just keep getting better and better with all your creations! I would love to win this giveaway!!
ReplyDeleteSo adorable! They look like something you'd see in Pottery Barn. I need some of those! If I don't win then I will have to make them myself...but winning would be so much more fun. LOL! Lisa~
ReplyDeleteyour fabric flowers are so very cute! I agree about the rectangle! They look so great there!
ReplyDeletegreat tute! fun giveaway!
gail
These are just SO pretty! I have some left over strips from a quilte I made, I might have to try it!
ReplyDeleteI've been wanting to try these fabric flowers for a bit now, but with my own "twist". Well, I won't be twisting anything when I make my dozen, cause you just perfected the technique. Bravo and thanks for sharing your genius! Pam @ Sallygoodin
ReplyDeleteThose are so adorable I love them!
ReplyDeleteCreative AND cute! You can't beat that combination! ♥ them!
ReplyDeleteThose are adorable. I love the rectangle vase idea!!!!
ReplyDeleteso darling! i love them!
ReplyDeleteAmazing. Sorry I missed the giveaway. Thanks for linking up at Trendy Treehouse. I am making some ToDaY!
ReplyDeleteThese are simply gorgeous! I just adore the fabrics you used. Adorable and chic. Thanks so much for linking to the Sunday Showcase party! I greatly appreciate it! Hope you are having a fabulous week! ~ Stephanie Lynn
ReplyDeleteHi Anj! I’ll be featuring your flowers today! Stop by and grab a featured button if you like. Thanks again for joining the Sunday Showcase Party! ~ Stephanie Lynn
ReplyDeleteFound you via Under the Table and Dreaming. Love your fabric flowers and your blog. Can't wait to see what else I find poking around.
ReplyDelete--
Teresa @ www.ItIsAgoodDay.blogspot.com
Anj...LoVe these! They are adorable! I just love your ideas and style...and you use the cutest fabric! I featured these here:
ReplyDeletehttp://thecreativecrate.blogspot.com/2010/06/long-stemmed-fabric-flowers.html
Thanks so much for sharing :)
This is sooo going on my to do list thanks!
ReplyDeleteThese are absolutley Gorgeous. I want to thank you for sharing your tutorial :) Although my sewing machine and I have just recently become aquainted , my first impression is that IT doesn't like me very much at all. So I'm going to try my best to bond with it and maybe someday I can attempt these beautiful flowers :)
ReplyDeletelinking your tutorial from here
http://sueboobadoo.blogspot.com/2010/06/wow-amazing-fabric-flowers.html
I love this, thanks for sharing! I also love your studio, from what I can see in the photos. It looks like you have lots of room to store things and to create. That is nice. :-)
ReplyDeleteAMAZING... My friend and I are going to make these tomorrow night... I have just spent the afternoon reading your whole blog! Better than a book! I love your decorating ideas and the GIFT of decorating you were blessed with! I am now a follower and can't wait to see what other creations you come up with! Blessings~ Jen
ReplyDeleteThese are SO BEAUTIFUL!! I think I may need to make a dozen or so for my dining room.
ReplyDeleteI linked to your tutorial on Craft Gossip Sewing:
http://sewing.craftgossip.com/tutorial-long-stemmed-fabric-flowers/2010/06/11/
--Anne
So sad that I missed the giveaway but I just had to say that these are ADORABLE! I think you just motivated me to finally learn how to use my sewing machine.
ReplyDeleteI am so sorry the giveaway is closed,but I must tell you I am in love with your beautiful flowers!!! what a novel idea on how to make them, very fresh and I love the mixture of colors. I will never again throw away a strip of fabric. I see many more of these in my future, thank you again. beautiful,just beautiful! Bonnie Nyquist
ReplyDeleteBonniesline@aol.com
A friend of mine emailed me this flower tutorial and I LOVE them!! Also had a chance to scroll thru your blog a bit...I cannot wait to see more!! Love your decorating style, so over the top FUN!!!
ReplyDeleteElise
Great tutorial I really want to try to make my own! Wish I could have found you before the giveaway ended! :(
ReplyDeleteOh how beautiful! I love your flowers. I just clicked over from Craft Gossip. I would love to link to this if you didn't mind.
ReplyDeleteThese are great! I LOVE them. Especially in that rectangular vase. Seriously adorable. :)
ReplyDeleteThese are so adorable! I love them so much I will have to make them for my girls!
ReplyDeleteThese are really fabulous! I love the leaves as much as the flowers I think! Just great!
ReplyDeleteI know the giveaway is closed, but I just had to say how cute and ingenious the flowers are. LOVE LOVE LOVE the rectangular box!!
ReplyDeleteI just posted about them... Love how they turned out... and TOTALLY admire the TIME you put into them, I can't believe you gave a dozen away! hahaha
ReplyDeleteWow...these flowers are super Cute!Thanks for the tutorial~
ReplyDeleteDaisy~
Adore these, how wonderful, and LOVE you're blog...just the inspiration I needed whilst I plan my 4 yr olds Tea Party. Definitely following!
ReplyDeleteThey are SO cute...featured you today:)
ReplyDeleteThese are the cutest. Thanks for sharing how to make them!
ReplyDeleteI'm officially inspired... once again!
ReplyDeleteCan I asked where you got the sticks and how long they were - I'm new at crafting but would love to try this. But i stress over wee details like that.
ReplyDeleteCertainly!
ReplyDeleteI got the sticks from a home decorating store that sells them in big bundles and then cut them down to size. I think though... you could just rummage through your yard, or even take a quick trip somewhere with a lot of trees and shrubs and see what's lying around.
To figure out how tall I wanted them I placed them in the vase first and then cut them all different sizes. The smallest were about 14 inches and the tallest about 19. I hope that helps!!!
I wanted to let you know that I featured this amazing tutorial over at Little Miss Momma!
ReplyDeletehttp://littlemissmomma.blogspot.com/2010/07/tutorials-im-loving-now.html
Feel free to grab a button if you want ;)
happy crafting!
They are fantastic! I'm sorry if it's already been asked but did you just get sticks from your garden? x
ReplyDeleteSara...
ReplyDeleteI actually bought a bundle of decorating twigs from a local decorating store. They were super long, so I just cut them up. However... you totally could, and if I could I would, use some from your yard. My yard is fairly new, so I don't have that option. I say go with free if you can;)
Anj, I can’t tell you how much I adore this! Thank you so much for the fabulous tutorial!! I featured this today on my blog with a roundup of flower tutorials. Here is the link:
ReplyDeletehttp://oopsey-daisy.blogspot.com/2010/07/wednesdays-wowzers-3-dozen-plus-four.html
Thank you so much for inspiring me. Have a wonderful day!
~Alison
Oh My Goodness these are just ABSOLUTELY DARLING!!! I would Love to have them lined up along my window above my desk in my soon to be office.....
ReplyDeleteawwww sad i missed your giveaway, but i just wanted to say i LOVE LOVE LOVE this! the flowers are beautiful and the fabrics you used are sooo lovely!
ReplyDeleteoh my, these are stunning, going on my to do list!
ReplyDeleteThese are so beautiful! I am featuring them at somedaycrafts.blogspot.com Grab my "featured" button.
ReplyDeleteOh, how did I miss this giveaway? Bummer!
ReplyDeleteBut I did want to tell you that these are fab- going on my "things to make someday when the kids are grown up and I have time for myself" list. ;)...but hopefully I won't have to wait that long.
I still want to comment even tho there is no giveaway. Your tutorial is fabulous! What nice bright photos and clear instructions. Thanks for sharing!
ReplyDeleteThese are just gorgeous! I know. I am saying the same thing everyone else has but I just had to. I just stopped staring at the screen completely mesmerized. Can not wait to try this!
ReplyDeleteLindas... Lindas... Amei muito são maravilhosas, Parabéns!!! Debora Rocha, Araraquara, São Paulo, Brasil
ReplyDeleteI cannot wait to try these flowers. Your right, I have seen LOTS of fabric flowers out in blog land..... but yours are WONDERFUL. Thank you for sharing!!
ReplyDeleteThese are so wonderful! My favorites are gerber daisies!
ReplyDeletethese are really nice!!!!
ReplyDeleteThese flowers are adorable! I was so inspired and wanted to share them!
ReplyDeleteI promoted your tutorial on my blog today! You can see it here:
http://bellarageous.blogspot.com/2010/08/tutorial-tuesday-long-stemmed-fabric.html
Sarah at Bellarageous
I just wanted to stop by and let you know that I linked to this post today from the new Home & Garden channel at Craft Gossip. :) My hope is to share many of the fabulous projects I see everyday with the vast CG audience. I hope you will not only stop by and subscribe to CG, but will tell your friends about the new category! Hope you see some traffic from it!
ReplyDeleteYour feature will appear in the main Craft Gossip RSS feed, on the main home page and can be found directly here
http://homeandgarden.craftgossip.com/pretty-fabric-flowers/
If you would like a "featured by" button, you can grab one here!
http://homeandgarden.craftgossip.com/grab-a-craft-gossip-button/
I love the red and white rose and the yellow and the pink it is so hard to choose because they are in my favorite fabrics small print calico. Brilliant idea and wonderful eye candy Thanks for the post Peg
ReplyDeleteI just found your blog, and I have to say awesome!!!
ReplyDeleteOh how cute. Now I know what to do with all those little bits of fabric I have that I can't throw away because I love them, but there isn't enough to make a whole lot of anything. Great idea!
ReplyDeleteBeautiful. I've got to try this!
ReplyDeleteThose are awesome, I really have to try these as I LOVE roses ♥
ReplyDeleteHugs from Marian from the Netherlands
Excellent tutorial and wonderful photography. I think the flowers without the sticks will be great in floral bib necklaces. I will feature in an upcoming blog post!
ReplyDeleteThose are gorgeous!! I linked to your tutorial over at Craft Gossip Sewing:
ReplyDeletehttp://sewing.craftgossip.com/tutorial-long-stemmed-fabric-roses/2010/09/07/
--Anne
These are fantastic! Love the contrast stitching. They're going right to the top of the crafternoon lineup...
ReplyDeleteAnd roses are my favorite flower... they remind me of my sweet Grandma Rose!
Love these!!!!
ReplyDeleteI am not nearly sewing confident enough for this but I ADORE these. PLEASE PLEASE PLEASE pick me!!!
ReplyDeleteStephanie :)
www.simplicitymom.blogspot
P.S. If I don't win, would you still be willing to make me some :)??
These are simply adorable, and you make it look so stinking easy. I've seen similar flowers all over, but your rectangular vase set up is so awesome. Gosh, I just love stumbling across these lovely ideas. I know this is an older post but I would so LOVE if you linked it up to my new party. It would make me all giddy and happy to have you check me out. Thanks Bella :)
ReplyDeleteI made your flowers and blogged them today: www.craftedition.blogspot.com - thanks for the tutorial!
ReplyDeleteWow, these are so cute! Thanks for the chance to win!
ReplyDeleteshelly at flottfamily dot com
these are tooooo precious! and i totally love the little leaves, they really make a perfect accompanyment to the flowers!!! and i think this technique would be awesome on a headband, broach or even on a purse strap... i'm going to have to try it one day soon!!!! thanks bunches!!!
ReplyDeleteI love those flowers. I am bit of a flower junkie. Thanks for sharing the tutorial. I would love to see pics of your studio. I am trying to get mine organized into something workable. Now it's just a mess of a room.
ReplyDeleteThank you for sharing! I am so in love with this project. This is exactly the look I have been wanting. Love the fabric roses, but I wanted something more 3-dimensional. Perfect!
ReplyDeleteThese are so great! Perfect for a garden party!
ReplyDeleteMy daughter used this idea to make a homecoming mum for a friend. The homecoming mum is a Texas tradition; sort of a scary Texas tradition.
ReplyDeletehttp://trailblazingmylife.blogspot.com/2010/10/october-kickoff.html
I love these! This is how I'm spending my day today, thanks!
ReplyDeleteBeautiful. I love the little leaves, nice touch.i really like it thank,s for great shearing.Send gifts to Pakistan
ReplyDeleteThose are adorable.I really have to try these as I LOVE roses.you have done brilliant work.i really impressive please keep it.Send Gifts to Pakistan
ReplyDeletenot bad at all. I actually think i can do this! lol
ReplyDeleteHello, I used your idea of beautiful flowers in my blog because I found it very beautiful. I'll make some for gift giving also the customers of my bridal studio will open in February, I'll send you the little pictures when they are ready. To access the post in which I used your idea: mimevaicasar.blogspot.com . Thanks Luciana
ReplyDeleteWonderful! Very popular in Pinterest too. ;-)
ReplyDeleteWonderful! These are popular on Pinterest as well!
ReplyDeleteGénial !!!!!!!!!! I love it !!!!!
ReplyDeleteJust found this on Pinterest!! Love them!!
ReplyDeletewhere did you find the stems flowers?
ReplyDeleteJust pinned this on my pinterest tutorial board!
ReplyDeletehttp://pinterest.com/srbracelin/tutorials/
Yellow roses are my fav. These are so cute!
ReplyDeleteSo pretty!! Can't wait to try them. Thanks for the tutorial!
ReplyDeleteI just LOVE flowers!!! My faves are probably lilies.
ReplyDeleteSo pretty. I would love to win since I just had a baby and put my sewing machine away for awhile
ReplyDeleteWow, these are awesome, if I don't win I think I might have to try making some of these!
ReplyDeleteSuch a useful project for all those scraps (I always have plenty if those LOL! A great idea for a gift for a person who sews too.
ReplyDeleteVery cute! I think if I'm naming a fave, I have to go with yellow roses. They just radiate happiness :)
ReplyDeleteThanks for the tutorial!
very awesome! I would love to make these for my studio!
ReplyDeleteBeautiful!!! Whenever my husband brings me roses home, my daughter always wants some and never wants to throw them out. So they end up getting all smelly {bad moldy} and droopy. With theses roses, she can have them in her room all the time!!!! I hope I win!! Thanks for posting the tutorial.
ReplyDeleteI love them and want to make some but where do you find those cool sticks?
ReplyDeleteArryn-
ReplyDeleteThe sticks came from a decorating store (tai pan trading). They sell bundles of twigs. I just cut them up to the size I needed.
I know the giveaway is over but i just wanted to comment. i just love the roses! You are very talented! i can't wait to get into my stash. My favorite flower is the rose. My mother's, rest her soul, middle name was Rose. She was lovely as a rose, and roses always remind me of her. i don't know if i will be able to make these flowers without crying. Anyway, thank you so much for this pattern.
ReplyDeleteHope you don't mind, I've copied a photo and linked to you as this is going onto my to-do list!
ReplyDeletehttp://upsicle.blogspot.com/p/to-do-wish-list.html
I just found you thru All Free Sewing...
ReplyDeleteGreat tute! Usually flowers are too "sweet" for me but I LOVE these! I'm just sorry that I missed your giveaway. I love the rectangle vase idea! A very modern take on a classic idea.
Thanks for the pattern. I can't wait to try making them. My favorite flower is the rose also but here in Oklahoma we have trouble with the "black spot" disease and so my roses don't look good in the garden. So I'll make these to have on my kitchen table. Thanks so much. Ginny Alexander
ReplyDeleteAbsolutely LOVE these!!! I can't wait to make my own. I'm including this in our roundup of beautiful flower crafts for party decor tomorrow. Thanks for sharing!
ReplyDeleteEven tho' your Giveaway is closed I couldn't resit saying how lovely your fabric roses are! I will certainly have a go at making some! I might have to stitch together several bits of leftover fabrics for each flower. I wonder how they would look with lace-edged petals .... :) Wonderful. Keep On Sewing!
ReplyDeleteLindas, lindas, lindas!!! Morri!!
ReplyDeleteThis is a good idea!
ReplyDeleteYour color of flowers are wonderful fabric!
Congratulations!
Maria/hungarian quilter
You know what? I know the give away is over. But I would like to leave this comment. You are surey a creative person. I am always looking for a project that would be easy for a beginner. Yes I am a beginner. When I saw these roses? I fell in love with them. I am going to save this to my collection of patterns. I love it and I will be trying to follow the directions on makeing this Rose. It will be my next project when I am sitting on a rainy day with the time to just sew, sew, sew. Please continue teaching us for make the projects you have so skillfully created. Thank You.
ReplyDeleteThe flowers are very nice. Look my blog:
ReplyDeletehttp://confiarte.blogspot.com
From Portugal
Luísa Neto
An excelent idea!
ReplyDeleteBeautiful and lovely.
Visit my place to {http://segredosdaanna.blogspot.com}. I'll love your visit very much.
Hugs.
I Love it, good idea!!!
ReplyDeletegiovanna - www.sistersinlaw.com.br
Oh goodness! These are so adorable! I am sooo making a dozen each for my mother and mother-in-law for this mothers day! Let's see... I have 6 days left... I better get sewing!
ReplyDeleteI do have a question... where did you buy the stems?
Hello,
ReplyDeleteI linked here from another blog and I couldn't be happier that I found this awesome tutorial. I am gonna love making some of these flowers to bring a bit of spring to this still rather chilly weather :)
Wow I love these. I am off right now to try and make some for my mom.
ReplyDeleteOh! Love the roses. Thanks for sharing this fabulous idea!
ReplyDelete-Rebecca
Thank you for the great tutorial! I just made a sample one to see how it would turn out. I'll be making many more of these beautiful flowers! I've got a party coming up for my daughter and plan to make these for decorating! Thank you!
ReplyDeleteI am so adding theses to my to do wish list!!!
ReplyDeleteMothers day is gone, but my mom's birthday is coming up! She'll love theses! Thanks.. you're amazing!
http://yelenasnest.blogspot.com/
These are so lovely! I wanted to make them.. so last week I finally did.. I did have one small problem... check them out and leave a comment and/or suggestion :)
ReplyDeletehttp://yelenasnest.blogspot.com/2011/06/fabric-flowers_03.html?m=0#more
These are so perfect!! I want t hem so badly!
ReplyDeleteYou my friend are immensely talented. =)
LOVE THE FLOWERS. What a great idea and they never die.
ReplyDeletejmiller_12@msn.com
acoupleofcraftaddicts.blogspot.com
obrigada.
ReplyDeleteJack.
Beautiful, süper :)
ReplyDeleteI just found this and LOVED it! Your work is awesome! And by the way, your instructions were just perfect & easy to understand...off to try some shabby roses of my own! Thanks for sharing!
ReplyDeleteI love these! I found your blog through Yelena's Nest and I have to say, it's really good :) x
ReplyDeleteWell hello. My name is Eva North and I'm just perusing your blog lately and I saw your tutorial for the fabric roses and let me just tell you, I LOVE THEM. Roses are my most favorite flower. And I'm gonna have to try making these soon.
ReplyDeleteThese are just fantastic! I will have to try them sometime.
ReplyDeleteI absolutely ADORE this project!! I hope you don't mind...But, I am sooo making these! (don't worry, I'll give you credit!)
ReplyDeleteI found these via Pinterest. WONDERFUL!!! Thank you sooo much! I'm a rose girl and I can't wait to make up a bazillion dozen of these. : )
ReplyDeleteamazing
ReplyDeletethese flowers are beautiful.... I would attempt to make them....but I dont have a CLUE as to how to do a gathering stitch. I am still learning so hopefully I will learn what that is. thank you for the info.... again the flowers are amazingly beautiful
ReplyDeleteSuch a cool idea. I found that stacking up the fabric strips into 2 1/2 inch wide accordion pieces made cutting the scallops much easier. Just make the stack and cut one scallop at the top. Thanks for the idea!
ReplyDeleteI'm using this tutorial to make table decorations for my MOPS group. I love how easy they are!,
ReplyDeleteI LOVE this and I want to make a dozen for a friend of mine who has just suffered a tragic miscarriage. Could I ask - how did you do the leaves? Did you sew them or just cut out two pieces and glue them (back to back) with a twig in between? I'd love any feedback you can provide!
ReplyDeleteThey are so beautiful. I love this blog. I was wondering if you could make them without needing the stick? I would like to make them and mount them all over the playroom wall?
ReplyDeleteI love daisies. They are simple and yet elegant.
ReplyDeleteI love roses, daisies, sunflowers, pansy's and many others.
ReplyDeleteYour sweet flowers look so fabulous I think they would make wonderful gifts for Christmas.
Thank you for sharing.
Carolyn
what a awesome gift for my friend who has severe allergies - I'm not able to give her fresh flowers, but these would be perfect!
ReplyDeleteLove these! Analyzing aloud here--my favourite is the blue checked/gingham one at the bottom. So I think I prefer the non-contrasting thread and the more closed flower, and the simpler pattern. I think it would be extra-beautiful if I specially tried to fray the edges. Thanks for this excellent tutorial! Not sure I quite get the gluing differences for the different styles yet. Will have to examine again and if necessary, ask, when I get to making them!
ReplyDeleteOlá!
ReplyDeleteParabéns pelo magnífico trabalho! São lindas!
Tentarei fazê-las e depois mando a foto.
Bjkssssss
ginapatchwork.blogspot.com
Olá!
ReplyDeleteVou levar este seu pap para um blog,onde divulgo postagens de pessoas amigas.Depois lhe envio um email com o link.Se você não gostar,retiro a postagem.Até breve,um beijo,Nena
i love this, lds women are so creative,
ReplyDeleteI made these not too long ago, and I love the way they turned out! I put the first few steps on my blog here: http://saleenamarie.blogspot.com/2011/10/tutorial-fabric-flowers.html
ReplyDeleteThanks so much!
<3 Saleena
I have just discovered your blog via Pinterest and was drooling over your fabric roses. I am ecstatic that you were generous enough to share how to make these. Now all I have to do is actually give it a go LOL! Have pinned it - hope that's ok. Blessings & thanks again.
ReplyDeleteI found your flowers through another person through another person on pinterest. Which I am new to and in love with!
ReplyDeleteanyway, I have fabric forever that is vintage and not knowing what to do with. Lots and lots of scraps.
They will become bouquets very soon!Thank you for sharing! So much!I have always wanted to do ribbon work and thought how one could use fabric instead, and here you did and they are so lovely.
All the very best to you, Sofia
ME ENCANTAN ESTAS FLORES ESTAN PRECIOSAS.
ReplyDeleteASI EN RAMO QUEDAN MUY LINDAS.
SALUDITOS
I love the light-heartedness of your bouquet!! So perfect for friends with long-term illnesses or allergies! Not to mention my windowsill... thanks for sharing!
ReplyDeletelove this so i will be pinning this to pintrest!! So i can find it when im ready to make these! They will go great with the jars i am making! Thanks for showing me how to make this ;)
ReplyDeleteBrenda
I am so pinning this so i can make these!! They will look awesome it these jars i am making!! Thanks for showing me how to DYI these!!
ReplyDeleteBrenda
Love you flowers. I am going to try them. Thanks for sharing
ReplyDeleteI love these flowers thank you so much for the tutorial, I will definately let you know when I have made them xx
ReplyDeleteThese flowers are *amazing!* I'm totally in love. I'm definitely going to be making some of my own once my house is unpacked :).
ReplyDeleteI just wanted to let you know that I linked this tutorial up on my blog to share your great project with others.
Thank you for sharing!
-Alexis
http://simplybeautifulveg.blogspot.com
beautiful work, and thank you for teaching me how to do, loved it!
ReplyDeleteI'm making these to go with mason jars and milk glass at my shabby chic wedding - they are absolutely perfect and your directions are spot-on! Where did you find the sticks you used? I bought floral wire, but they look so ...ehhh... compared to the vibrancy of the fabrics. Thank you!
ReplyDeleteFound these gorgeous flowers on pinterest! I'm making them for my shabby-chic wedding to stand in as centerpieces with mason jars and milk glas, they are just perfect with my whole theme - thank you so much for the spot-on directions :) Where did you find the sticks you used? I initially bought floral wire, but after cutting all my fabrics into strips I feel like they don't do the overall craft justice. Thanks again!
ReplyDeleteI really love these. I would like to it.
ReplyDeleteIts worth your BLOG I mean a million. Love the print & colors. I m so excited to get at it.
ReplyDeleteI featured this on my blog this morning. Hope that's ok. Would love for you to go and check it out :)
ReplyDeleteAdele @ Mammy Made
I, too, love the rectangular vase. I could totally make these!
ReplyDeleteThanks a lot! I do love flowers, roses, colours and fabrics... Now I know what to do ;) It´s now much better day to go and work in the evening at the hospital :) Roses on my mind...
ReplyDeleteThanks a lot! I do love flowers, roses, colours and fabrics... Now I know what to do ;) It´s now much better day to go and work in the evening at the hospital :) Roses on my mind...
ReplyDeletevery beautiful !!!
ReplyDeletevery beautiful
ReplyDeleteLove it! Especially the hot glue!The colors are beautiful! I'm sharing this with the girls.
ReplyDeleteGave you a shout out
ReplyDeletehttp://4you-withlove.blogspot.com/2012/05/happy-may-day-2012.html
Marilyn
Love your flowers! I wanted to let you know that I just made my mom some for Mother's Day and did a post about it on my blog. http://urbanhoot.blogspot.com/2012/05/sew-cute-flowers.html
ReplyDeleteThis is such a cute idea! If I wanted to make this into an accessory like a pin, perhaps do you think the glue gun would hold the flower onto the back of the pin 'hardware'?
ReplyDeleteThis is such a cute idea! If I wanted to make this into an accessory like a pin, perhaps do you think the glue gun would hold the flower onto the back of the pin 'hardware'?
ReplyDeleteMy daughter and I made a bunch of these, too. Thank you for the tutorial!
ReplyDeletehttp://faithfulstewards.wordpress.com/2012/05/04/more-flowers/
Thanks for the tutorial!!! I made a little bunch of roses for a coworker returning from medical leave and then single mini rose in a tiny pot for each of my coworkers for May Day! Just lovely :)!
ReplyDeletesono bellissimi questi fiori ,brava passa da me www.metalfimo2.blogspot.com
ReplyDeleteAdoro flores seja de verdade ou de tecido de eva e as suas florrs são belas estou fazendo um aranjo de flores de eva breve irei publicar no meu blog. Parabéns adorei ela é bem fácil de fazer.
ReplyDeleteFound these via a link from ALLFREESEWING which I subscribe to. I will be making these. Great idea for a gift that I can put into my "gift cupboard" and have on hand. My favourite flower is the carnation. I think I could adapt your idea to make a carnation by using a pinking shear edge instead of a scalloped edge. Will have to try that and will send you a picture if it works out ;) Thanks again for your very clear tutorial.
ReplyDeleteKaren
I love ...i love it!!
ReplyDeleteI love ...i love it!!
ReplyDeleteI love ...i love it!!
ReplyDeleteOh my goodness!! These are SOOOO pretty! The perfect thing for my home, where we all suffer from hayfever! Brilliant! Thank you. :-)
ReplyDeleteMolt boniques, gràcies pel teu tutorial.
ReplyDelete