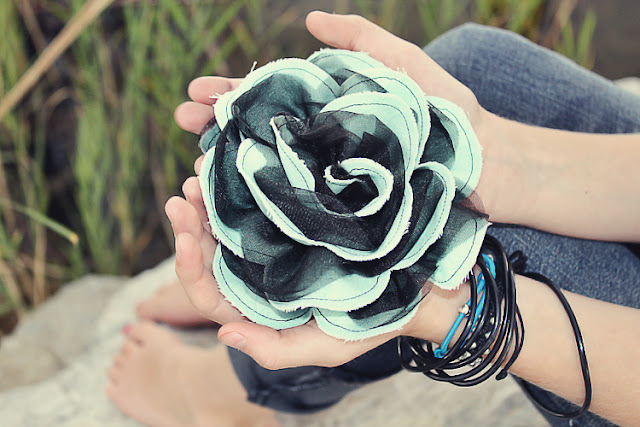
I've had a few people ask me if it's possible to make my long stemmed fabric roses and omit the stem. That way you have a lovely rose you could use as a super darling hair clip or brooch.
Well certainly you can!
I make them all the time, and have been ever since I started making those long stemmed beauties.
Now here is the thing… You can hit the mall and pick up a hair flower for about 5 bucks. So this project isn't for everyone. However, these work great when I need a rose in a specific color. Or when I've sewn a skirt for my girls and want a hair piece to match. I think they would also be fun for cheer squads, or when you're just a spectator but need to wear the appropriate team colors to a game. I'm sure you could come up with more ideas than me… I've been editing these photo's and writing this tutorial for the last 5 million hours (I'm positive it's been at LEAST that long).
My brain is working at a slllloooowww crawl.
I've made these roses in two "styles".
One style is with just one strip of fabric.
And the other (I admit I do it this way more often)
with an extra sheer piece of fabric.
(My daughter in the photo above is wearing this style).
If you want to do it this way, you'll need fabric that won't fray too much when you cut it. I use what is called Nylon Chiffon It's the same fabric they use to make those fabulous pettiskirts. I purchased mine in the 5 inch width rolls… that way I don't have to do a lot of cutting.
Alrighty… let's get started. If you've made the long stemmed flowers, this will be very familiar to you! (If not, just ignore the many times I refer back to them).
1. Cut your fabric (selvage to selvage) in 5" strips. (approximately 5"x 45" long strips).
2. Fold strips in half lengthwise (wrong sides together) and press. Your strip is now 2.5" x 45-ish"
3. Trim off selvage edges (finished edges).
4. Now to cut the petals. Scallop the open ends of the strip. Each scallop is approximately 2.5 inches. If you make a small mark at the open end every 2.5 inches it will help guide you as you cut.
Hint…. To make things easier, I cut out one and keep it as a template to make all my other roses. I simply take my template and place it on top of another strip and use it as a pattern to cut the scalloped edge. These don't need to be "perfect."
5. Now on my stemmed rose pattern, I have you leave a "tail". On this one we don't do that. For your last three scallops or so (only on one end), make them taper down in both height and width. (You want it to look like the top strip of fabric, not the bottom one in the photo).
6.Now to cut the optional sheer fabric.
Cut a 5 inch strip the same length of the printed fabric strip. Just like the other one, fold in half lengthwise.
Now because this fabric is so thin there is a quicker way to scallop it.
Fold the fabric back and forth on top of itself at about 2.5 inches. Like an accordion. Once it is all folded, trim the top (open edge) in a half circle. Open it up… and voilà… you have a lovely scalloped strip of fabric. (This trick won't work on the printed fabric… It's just too thick and the scallops end up looking messy).
Then repeat the same thing we did on the other strip and taper the last few scallops by simply trimming them down a bit.
7.Now sew the open ends (scalloped edges) together on the printed fabric.
8. Next place them on top of each other.
Make folded edges at the bottom even. Don't worry if the scallops don't line up… I actually prefer that they don't.
9. Now we sew the two pieces together with a gathering stitch. You can do two gathering stitches parallel to each other if you are worried about the thread breaking. You also can use a gathering foot if you've got one! (You don't need to open up the fabric and stitch down the center like on my stemmed flowers.
In the end the stitches will be hidden under a piece of felt… so it doesn't need to look pretty). I stitched my gathering stitch 1/8th of an inch from the bottom.
10. Now gather the fabric… I take my time on this step, and I'm super delicate with the thread so I don't break it.
And there is the gathered piece.
11. Now if you used two fabrics you have a choice to make. Roll the gathered strip up into a rose. First with the sheer fabric side up (left photo) and then roll it again with your patterned fabric side up (right photo). The look changes, so decide which way you like it before you move on to the next step!
12. Alrighty… let's sew the rose together. Start rolling in the end with the tapered scallops. Make sure you have your favorite side up (or facing in). With a needle and thread stitch through the layers at the bottom of the rose. I like to go in where the gathering stitch is. Wrap a bit more of the fabric, stitch through all the rolled layers again… and repeat and repeat and repeat.
You may get to a point where the needle is having a hard time stitching through all the layers. If this happens bring the needle only to the center of your rose. Then stitch back out from the center to the outside again. Continue doing this until you've finished.
13. Sew a knot at the end, cut any excess thread and there it is.
14. Now attach a two inch round cut of felt with your preferred adhesive. (I use a hot glue gun). If you want to get all fancy pants, you can do a blanket stitch around the edge of the felt. It will give it a professional finished look.
(I'm not that fancy, or professional).
15. Then attach the clip of your choice. I used a Dual Brooch Pin Back Base, that way it can be a hair piece or a brooch! Everyone wins!
And you're all done!
Momo was my little helper. He colored up on the counter while I cut, sewed and photographed. We also almost became victims of THEE most aggressive fly I've ever encountered! I swear it pummeled my face no less that 20 times. I'd love to say no one was harmed during the making of this tutorial… but that fly had it coming!
(I'm sure you all wanted to know that).
These roses are statement pieces!
They are not petite.
The finished rose measures about 5 inches in diameter.
Here is another one. I made this rose for Ride's Easter outfit… two Easters ago. (I used the same fabric for her Easter skirt).
Ahem…I really really really should have made this post back then. It was the original plan. I even had the photo's and everything.
But I took a blogging break.
I'll explain my disappearance in an upcoming post.
Scooter and I went out and had a ball taking some "modeling" pics of the fabric rose.
We got a little carried away.
We did a "back to school" shoot.
Love this girl!

 Fabric Roses... without the stems!


I love these big fluffy roses. They are definitely a statement! Yes, your darling girl is a treasure.
ReplyDeleteAnj, you are amazing, and so by the way is your daughter! But then I'm very prejudiced!!!!
ReplyDeleteThis is so cute!
ReplyDeleteBeautiful. Can't wait to make some of these for my daughters room redo. We are making a window flower box (on the inside of the window) and these are perfect for that. Will look a lot like your stemmed ones in the rectangle box. eeek, can't wait. Thank you for sharing.
ReplyDeleteThankyou, Thankyou for sharing another lovely craft. You're so creative and I'm glad your back.
ReplyDeleteAbsolutely ADORABLE!!
ReplyDeleteReally love these BIG flowers. they are just too much fun :)
ReplyDeleteI totally LOVE these and can't wait to try (and hopefully not fail) at making a few :) thanks for sharing the awesomeness!!
ReplyDeleteonelittlemomma sent me. Love these and the stemmed flowers too. I'm excited to do it! Thanks for the tut. P.S. This girl has a lovely Gweneth Paltrow smile.
ReplyDeleteAmazing! I aspire to do this and be as detailed and delicate as you! Greatness!!
ReplyDeleteCan't thank you enough for sharing how to make these lovely flowers. I'll enjoy showing my grand daughthers when they come for a visit.
ReplyDeleteSooooo beautiful! Gorgeous sweet top model :)Thanks for sharing tutorial!
ReplyDeleteHave a wonderful week!
Hugs from Portugal,
Ana Love Craft
www.lovecraft2012.blogspot.com
I know I'm a year behind but I found you via Pinterest for your fabric rose tutorial. I just wanted to say your beautiful daughter looks like a mini-Gwenyth Paltrow :)
ReplyDelete