Tuesday, September 25, 2012

 Supercalifragilisticexpialidocious


I've been planning our Halloween costumes this year.  We always try to have a matching theme as a family.  We've done Alice in Wonderland, Nightmare Before Christmas, The Snow Carny, The 50's and I'm sure there are more (my brain is shot, I've had 2 kids and a husband with strep throat, and I can feel myself getting sick as I type.  
Who knew fingers could weigh 5 pounds each).  
It's funny how much my kids love dressing up as a family.  I know the year will come when one of them will finally protest.  But a couple weeks back my girls both came to me asking what "WE" were going to be for halloween this year.  
I love it.

So if you're looking for a costume idea here is what we did last year…
K… I'm going to admit something.  Most young girls have crushes on the Justin Beiber's of their day.  I had a crush on… I'm almost embarrassed to admit this, but it's the truth. 

Dick Van Dyke. 

Yep.

No lie.  
My dad owned a video store, one of the first in our town.  Back then you had to rent the movie and then the 50 pound VCR just so you could watch the video.  
It was called Video Express.
I still remember adding the "be kind rewind" stickers onto the tapes, (most of the stickers made it onto my clothing and face rather than the videos) and helping myself to the candy and soda pop in the store.   I also remember thinking the teenage employees were soooo cool.  There was particular girl with long gorgeous blond hair who would wear it in a side pony tail that twisted.  
I felt "like, oh my gosh, so totally rad" when my mom would do my hair like hers.
(I still remember when she came to our house and taught my mom how to do this hairstyle on me.  I felt so special).
One of the first "kid" videos he purchased was 
Chitty Chitty Bang Bang.  
We would watch it over and over.  Perhaps that's where it all started.  But man, I thought (and still think) Mr. Van Dyke was darling.  Now the funny thing is… I kind of married him.  
People who know J will laugh in agreement.  
J walking around dressed as Bert, interpreting his gait and attempting that cockney english accent was perfection. 
He honestly could have gotten a job at disneyland.  

Then we have…

A bit of a stretch, but it works.
I found this pattern for the wings 
The skirts & masks I just made up on my own. And then there is me as...
 I had the coat.  The hat is a bowler hat (from a costume store).  I beat it up, added a few staples here and there and then glued on the flowers and cherries.  The umbrella was the only big halloween costume purchase of the lot.  I got it at the Disney store.

Now if only I could snap my fingers to clean the house.  (Although I don't know if I could manage to snap… remember, they feel like they weigh 5 pounds each).
Halloween… such a jolly holiday! 

Wednesday, September 12, 2012

 Mr. Copperpot


There is a chill in the air! 
I have to slip on socks first thing out of bed to warm my froze toes.   We open our windows on friday nights to listen to the high school kids cheering at the football games.  (We know if they are winning or not just by how loud they get).  The kids are back in school, wearing sweaters and jackets that are clearly not needed yet… but they like to layer as much as their mommy does. Night is creeping up earlier and earlier.  And I get all giddy.  
Fall is here!

I debate it every year… how early is too early to set up halloween?  I seriously can't help myself.  
This post is a halloween decoration I've had for a couple years now.  Don't worry, these photo's are from last year…. I have not set him up yet.  
Soon though… very soon.

In the two times I've been to Disneyland in the last decade I've made sure that we go when the Nightmare Before Christmas is set up at The Haunted Mansion.  If you know me, you know I'm a fan of Mr. Burton and his crazy dark artsy-ness.  I wish I could just magically decorate my house like the mansion for halloween.  Alas I have not the funds or enough waking hours to attempt it. :)

On the outside of the mansion it's decorated with all of these fabulous cartoony skulls.  They are both a tad creepy and a bit comical & dopy at the same time.  I know, it sounds weird, but it works.
I wanted to add my own.  Instead of making several small skulls (as they have on the Haunted Mansion) I made one very large skull.  
Here is Momo next to him.  He's not small, he measures about 4.5 x 3 feet. My husband often states that my motto is "Go big or go home".  As much as I'd like to say it's not true, 
I think he might be very very correct. 
I painted him on masonite.  My neighbor who is always coming to my… "help me I need to build something" rescue cut him out with his jigsaw.  
(For the love, I need to finally just purchase a jigsaw). 
After the skull was painted and dry I added a coat of matte varnish (just from a spray can).  I think this will be the third year (maybe forth) we've put him up.  
He has made it through wind, rain & snow.  
He still looks good as new.
I love putting him up every year.  He makes me smile every time I pull into the driveway.


Perhaps I should name him.  
Any thoughts on a good name????
Maybe I'll call him Chester Copperpot.

K, before the skull was drawn and painted onto the masonite, I first sketched him out on paper.  Here is the drawing… you're welcome to use it if you'd like.  If you have a projector you could shine him up on your own board and make your own. :)  I can't give painting lessons though… that would be a bit too intense of a tutorial. 
Again… it's just the rough sketch, not a masterpiece or anything.  Be forgiving, at least I cut off the grocery list I had written on the bottom of the paper. 
Although, I believe it still carries the creases from where I sat on this grocery list because I left it on the front seat of the car.  Ooops.

And yes… I'm listening to my Halloween soundtrack while I write this post.  
Here is what's on  my soundtrack (incase your looking for some music to add to your own)…
Corpse Bride Soundtrack
Coraline Soundtrack
(End Credits & The Supper)
Nightmare Before Christmas Soundtrack
A few Harry Potter Favorites
 Dementors in the Underpass (Order of the Phoenix), Double Trouble (Azkaban), 
Story Continues (Goblet of Fire) & Finale (Azkaban)
Beetlejuice Soundtrack 
(a few select songs)
Edward Scissorhands
(Ice Dance, The Cookie Factory & The End)
Tales from the Crypt 
Danny Elfman is 90% of my soundtrack.  
Sure beats listening to The Monster Mash… (although it was a graveyard smash).  
Just thinking about that song gives me a headache.  

Happy Fall All!

Friday, August 31, 2012

 Fabric Roses... without the stems!


I've had a few people ask me if it's possible to make my long stemmed fabric roses  and omit the stem.  That way you have a lovely rose you could use as a super darling hair clip or brooch.
Well certainly you can!  
I make them all the time, and have been ever since I started making those long stemmed beauties.  
Now here is the thing…  You can hit the mall and pick up a hair flower for about 5 bucks.  So this project isn't for everyone.  However, these work great when I need a rose in a specific color.  Or when I've sewn a skirt for my girls and want a hair piece to match. I think they would also be fun for cheer squads, or when you're just a spectator but need to wear the appropriate team colors to a game.  I'm sure you could come up with more ideas than me… I've been editing these photo's and writing this tutorial for the last 5 million hours (I'm positive it's been at LEAST that long). 
My brain is working at a slllloooowww crawl. 

I've made these roses in two "styles".  
One style is with just one strip of fabric.  
And the other (I admit I do it this way more often) 
with an extra sheer piece of fabric.
(My daughter in the photo above is wearing this style). 
If you want to do it this way, you'll need fabric that won't fray too much when you cut it.  I use what is called Nylon Chiffon It's the same fabric they use to make those fabulous pettiskirts.  I purchased mine in the 5 inch width rolls… that way I don't have to do a lot of cutting.
Alrighty… let's get started.  If you've made the long stemmed flowers, this will be very familiar to you! (If not, just ignore the many times I refer back to them).
1. Cut your fabric (selvage to selvage) in 5" strips.  (approximately 5"x 45" long strips).

2. Fold strips in half lengthwise (wrong sides together) and press. Your strip is now 2.5" x 45-ish"

3. Trim off selvage edges (finished edges).

4.  Now to cut the petals.  Scallop the open ends of the strip.  Each scallop is approximately 2.5 inches.  If you make a small mark at the open end every 2.5 inches it will help guide you as you cut.
Hint…. To make things easier, I cut out one and keep it as a template to make all my other roses.  I simply take my template and place it on top of another strip and use it as a pattern to cut the scalloped edge.  These don't need to be "perfect."
5. Now on my stemmed rose pattern, I have you leave a "tail".  On this one we don't do that.  For your last three scallops or so (only on one end), make them taper down in both height and width. (You want it to look like the top strip of fabric, not the bottom one in the photo).


6.Now to cut the optional sheer fabric.  
Cut a 5 inch strip the same length of the printed fabric strip.  Just like the other one, fold in half lengthwise.  
Now because this fabric is so thin there is a quicker way to scallop it.
Fold the fabric back and forth on top of itself at about 2.5 inches. Like an accordion.  Once it is all folded, trim the top (open edge) in a half circle.  Open it up… and voilĂ … you have a lovely scalloped strip of fabric.  (This trick won't work on the printed fabric… It's just too thick and the scallops end up looking messy).  
Then repeat the same thing we did on the other strip and taper the last few scallops by simply trimming them down a bit.

7.Now sew the open ends (scalloped edges) together on the printed fabric.
8. Next place them on top of each other.  
Make folded edges at the bottom even.  Don't worry if the scallops don't line up… I actually prefer that they don't. 
9. Now we sew the two pieces together with a gathering stitch.  You can do two gathering stitches parallel to each other if you are worried about the thread breaking.  You also can use a gathering foot if you've got one! (You don't need to open up the fabric and stitch down the center like on my stemmed flowers.  
In the end the stitches will be hidden under a piece of felt… so it doesn't need to look pretty).  I stitched my gathering stitch 1/8th of an inch from the bottom.

10. Now gather the fabric… I take my time on this step, and I'm super delicate with the thread so I don't break it.
And there is the gathered piece.
11. Now if you used two fabrics you have a choice to make.  Roll the gathered strip up into a rose. First with the sheer fabric side up (left photo) and then roll it again with your patterned fabric side up (right photo).  The look changes, so decide which way you like it before you move on to the next step! 
12. Alrighty… let's sew the rose together.  Start rolling in the end with the tapered scallops.  Make sure you have your favorite side up (or facing in).  With a needle and thread stitch through the layers at the bottom of the rose.  I like to go in where the gathering stitch is.  Wrap a bit more of the fabric, stitch through all the rolled layers again… and repeat and repeat and repeat.
You may get to a point where the needle is having a hard time stitching through all the layers.  If this happens bring the needle only to the center of your rose.  Then stitch back out from the center to the outside again.  Continue doing this until you've finished.
13. Sew a knot at the end, cut any excess thread and there it is.
14. Now attach a two inch round cut of felt with your preferred adhesive. (I use a hot glue gun).  If you want to get all fancy pants, you can do a blanket stitch around the edge of the felt.  It will give it a professional finished look.  
(I'm not that fancy, or professional).

15. Then attach the clip of your choice.  I used a Dual Brooch Pin Back Base, that way it can be a hair piece or a brooch!  Everyone wins!  
And you're all done! 
Momo was my little helper.  He colored up on the counter while I cut, sewed and photographed.  We also almost became victims of THEE most aggressive fly I've ever encountered!  I swear it pummeled my face no less that 20 times.  I'd love to say no one was harmed during the making of this tutorial… but that fly had it coming!  
(I'm sure you all wanted to know that).

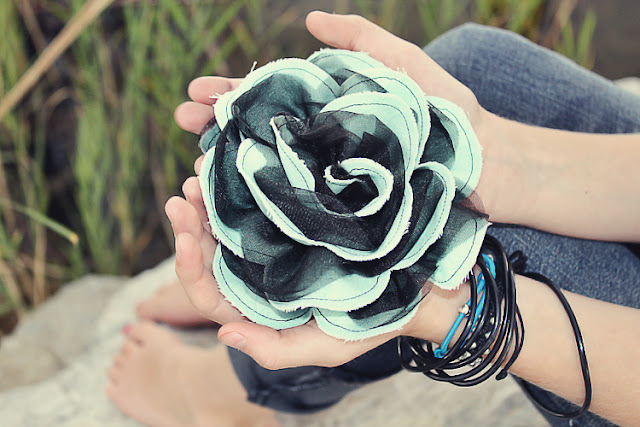
These roses are statement pieces! 
They are not petite.  
The finished rose measures about 5 inches in diameter.   
Here is another one. I made this rose for Ride's Easter outfit… two Easters ago.  (I used the same fabric for her Easter skirt).  
Ahem…I really really really should have made this post back then.  It was the original plan. I even had the photo's and everything.  
But I took a blogging break. 
I'll explain my disappearance in an upcoming post. 
Scooter and I went out and had a ball taking some "modeling" pics of the fabric rose.  
We got a little carried away.  
We did a "back to school" shoot.  
Good times!


Love this girl!

Thursday, December 22, 2011

 Glorious Song of Old


I love the holiday season.
I attempt to get everything done and out of my way before December hits.  That way I can just enjoy!  I love it… the lights, the laughter, the food (which will be the death of me) the music, the love, the friendship and all sincere expressions of gratitude that come with it.  What a magical time!

I love celebrating family.  My family is my dearest and most precious joy.  I have these loud, often dirty, little giggling rug rats that fill my home with happiness, dancing, giggles and smiles.  My happy handsome husband.  We just celebrated our 11th anniversary!  I love him so much. And then I have an extended family.  Each person has added so much to my life, my happiness and has left a impression on me.  Marks that will never fade, and that I treasure.  Many that helped raise me, or were raised with me. 

I am sitting on my couch, snug in a blanket.  I've been sick, miserably sick.  
Even though the sinus pressure in my head is squeezing my brain, I feel happy.  I feel at peace.  
The lights on the tree make the room glow. I'm listening to my cousin sing, her voice has me grinning ear to ear.  
Many many years ago, she came up to Utah to stay with my family for a few months.  I remember her singing in the shower.  It made our already happy home shine even more. 
She just released a new rendition of Silent Night.  She added her own lyrics, and created her own unique arrangement of my all time favorite Christmas song.  It has brought such a special spirit of peace to my home.  Listening to her voice through my stereo makes me smile. 
  
So let me introduce you to her…
This is Katherine.
I know, quite the beauty, isn't she?!
She also is incredably witty,  has a great raspy laugh,  and will eat pickle relish by the spoonful.  
I adore her. She is a very talented musician, a lovely woman, and simply dear to me.  

Here is a video of her performing 
Glorious Song of Old (Silent Night).
Her sister's husband, (my other cousin who I love more than words.  She's my hair designer. She molds my hair into yumminess and is a creative genius when it comes to hair color. Additionally she's just cool.  Sometimes I hope that just by standing near her she might pass some of that to me.  Like a cool virus or something… much better than this cold virus.) so anyway… he created the video.  Yeah… there is just a little bit of talent oozing in this family's blood.
Here is her website, where you can download her Glorious Song of Old (Silent Night)christmas song free.  
I hope her voice brings a bit of happiness and peace into your home, as it has mine.  

Merry Christmas!  
May your holiday season be filled with peace & joy!
XoXoXo
anj.

Friday, September 2, 2011

 Polka Dot Cake


I know... it's a little early for halloween, but I made a cake.
 And the inside is even better... because I made a 
Polka Dot Cake!
 I've had this idea in my brain for awhile.  It turned out pretty good.  But I think after my first attempt I'd tackle it a bit differently next time.  I'll give you my thoughts on that after the directions.  
 Here's how I did it.
I have this little nifty cake pop maker.  It's fun, especially for the kids.  It doesn't make the decadent bakerella cake pops, they are actually more like a donut hole.  But they are quick, easy and so far fail proof.  Anyway… this is how I made the polka dot cake.
Step 1 
I made the cake balls with the cake pop maker.  Using the recipe that comes with the machine, adding orange food coloring.
 I honestly wonder if you could just get some donut holes and use them.  Or maybe make a sheet cake, and use a melon baller to scoop out spheres.  Some experimenting is needed. :)
 Step 2
Cut a bunch of the cake balls in half with a knife.
Step 3 
Make the cake batter (I just used a boxed cake mix.  This one is devils food, it sounded halloweenish.  I added a little black food coloring to it as well).  
Step 4 
Pour a small amount of batter into the bottom of a greased and floured pan.  Then push some of the half sized cake balls flat side down into the batter.
Step 5 
Add a little batter to a halved cake pop, onto the flat side, and then stick it to the side of the pan.
 Continue this step until you have halved cake pops around the side of the pan
Step 6 
Add more batter into pan.
Step 7 
Place a bunch of full sized cake balls into the batter.
Step 8
Top off with more batter
Step 9
Cook.  
It took longer to bake than the directions on the cake box stated.  About 10-15 minutes extra. I'm sure it has something to do with all the cake balls in there.  And p.s. I was worried that the cake balls would dry out, from cooking again, but they were just fine, and the devils food cake itself was awesomely moist.
Step 10
Cut off any extra poofy cake from the top to level it.
And there you go!  I made two, and stacked them with orange colored frosting in-between.  You could do this in any color.  I think a white cake with pink polka dots would be just about the most precious cake ever!

Alrighty, now I'm going to tell you how I'll be attempting it next time.  I think it will work better this way.   In step four Instead of just placing half of a cake pop down, I think I'd do some cake balls half size and some whole.  Then I wouldn't worry about step sevenWhen the cake rose, it caused the full cake balls to rise with it, and when I lopped off the top of the cake (step ten), it caused the whole cake pops to become half cake pops.  They got cut along with the cake.  (Does that make sense).  So I didn't get any full polka dots.  I am planning on making another one of these.  
I'll let you know how it goes!  

Is it bad that I'm showing you my sort of, kind of, turned out Polka Dot Cake and not a perfect one that may come after a few attempts? I'm sure I'm breaking all sorts of blogging unwritten rules.  
The blogging police would probably be gasping and tisk tisk tisking me.  
I also shouldn't tell you that the back of the cake looks like it was mangled by a rabid dog.  
I was having major fondant issues, and instead of throwing it through the window (I almost did… really, I was so frustrated), I just kinda smashed the fondant all to one side.  Then I decided it would be the back side, and I'd call it a day.   
I should have taken photos… it would have made you laugh.  

Aaaannnnd…. I made you something.
  Here are some free little halloween labels.  Just like the little "Eeek" sign next to Mr. spider.  Go ahead, download and enjoy.  They'd be cute as cupcake toppers too.  Fun, fun!

Have a happy labor day weekend everyone!  
anj.
P.S... I used this technique for my daughters Princess and the Pea Party with white cake and green cake balls.  You can check it out Here...
HapPea Birthday Party