Tuesday, June 22, 2010

 A Story Worth Writing

Our story is being written.   
It includes simple chronicles. Such as the magic that happens when J comes home from work each day.  It's as if a switch has suddenly flipped inside each our children and they glow as they gallop, skip, bounce and cartwheel to his side.  And me… well my heart smiles.  
Other chapters are more complex. The times welcoming fresh spirits into the world.  And times we had to say goodbye. These passages could be filled with broken dreams or with certain bliss.
Our memoir is precious and imperfect. It's filled with laughter, tears, joy, heartache, prayer and hope. And we are only 10 years in the making.  
I envision the day when our two antique and fragile lives walk hand in hand.  Thin skin covered in wrinkles. Minds overflowing with visual treasures.   Two old souls who's tale includes each other on every page.  That is a story worth writing.
Love you forever J
Happy fathers day

Tuesday, June 15, 2010

 Sweets For A Sweetie

For Scooters birthday this year we didn't have a party with friends.  J and I decided that when the kiddo's turn eight their party will be with family following their baptism.  So we fired up the grill and enjoyed the afternoon with la familia.  Here are some photo's from the day.
Us before her baptism.
Happy Birthday Sweetie!
Drinks and such.
OK.. so I wanted to attempt a dessert table.  I'm no Amy Atlas (I'm slightly obsessed with her talent) but I gave it a whirl.  I think it turned out pretty swell for a very budget conscience arrangement. Here's photos…
I went a little tissue paper pom pom crazy.  
Then I used left over paper chains from the midnight tea party.
I filled the table with inexpensive sweet treats.  Cupcakes, mint chocolate dipped oreo's, marshmallow pops (check out these magnificent marshmallow pops at restless risa), cream puffs, cupcake bites (thank you bakerella), and other goodies.  The kids at the party felt like they were in a sweet shoppe.  
Mmmm… sugar…..
I made this tiered tray from plates and cups from good will.
The idea came from flamingo toes.
It cost me 7 bucks.
It was such a splendid day!
p.s. Did you notice I posted two days in a row...unprecedented!

Monday, June 14, 2010

 Simply Sweet Scooter

This little pretty thing just turned eight!!!
We baptize children after they turn eight in our faith.
My cousin Paula made Scooter this perfectly precious little white dress for Scooter to wear that day.
How cute is the back of this dress!?!?
Let's take a closer look…
Simply adorable! 
Eyelet, ruffles, and a hint of pink...lovely.

A few things  about my Scooter I love…
She is kind.
She is a little mother.
She is dedicated to what ever she decides to do.
She's compassionate and thoughtful.
She is happy, independent and loyal.
She is a dancer, a tumbler and a soccer player.
She likes to play board games and read books.
She loves most foods, but doesn't care for peanut butter.
She loves soup, salad and sandwiches the most.
She makes lists, she's 1,000 times more organized than her mother. 
She's eager to please.  
She giggles and giggles and then giggles a little more.
She has a big smile… 
that is currently filled with teeth that are quite large and screaming for a visit to an orthodontist.
She is sweet spirited.
She is now eight years old.
Oh, how I wish I could freeze time.
I love this little lassie.  I'm so proud of her.  Every time I look at her I can't believe I get to be her mom.  
I'm one blessed gal.

Monday, June 7, 2010

 We Have A Winner

Thanks for all of your kind comments!
To answer a couple of your questions...
a couple of you wanted to see photos of my studio.  I'd love to share it with you.  (It's my favorite room in our home...) I'm doing a couple of things to it, when I finish those up I'll post photos!
I get my fabric from all over.  These all came from JoAnn... I like their prices, but there are times I walk away empty handed.  I lucked out on my last trip.
Now for the giveaway...
I love giving something away.  It's so fun. I always wish I could give one to everyone.  Truly!!! I had so many sweet comments.  I love hearing from familiar folks, and new viewers.  Each comment just means the world to me.  So thank you! 
I left it up to the random generator.  
And so the winner of... 
1 Dozen Long Stemmed Fabric Roses is...
number 27!
Who is...
Natali Thompson
Congrats miss Nat... I'll be contacting you shortly.
I have a couple of things in the works.  So hopefully another giveaway is in the near future!
Love to you all!

Tuesday, June 1, 2010

 Long Stemmed Fabric Flowers

So the last few weeks have been overwhelmingly filled with busyness.  And this week is no exception.   Criminently this time of year always about does me in. 

However I thought I'd pause and blog a little tutorial.  All of the fabric flowers out in blog land just kill me.  They are all so fabulous.  I wanted to add a bit of fabric flower goodness to my studio.  I've had these on the brain for quite some time and I finally got around to creating them.  I think spring inspired me.   So here's how they turned out…
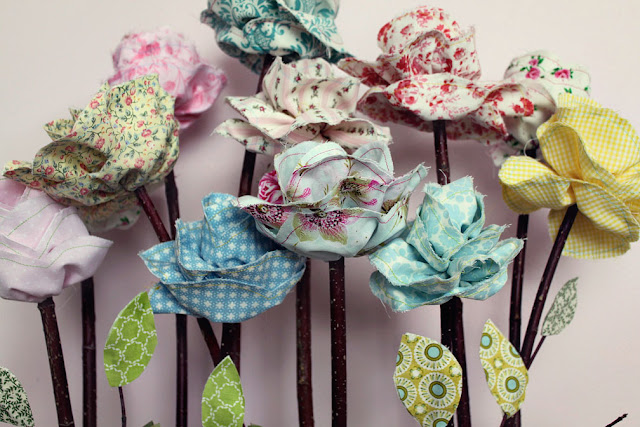
1 dozen long stemmed fabric roses!
Now my studio is wearing a smile.  Now If only I could keep it clean. Hmmm….

So here is how I made them.
1. Cut fabric (selvage to selvage) in 5" strips.  (approximately 5"x 45" long strips).
2. Fold strips in half lengthwise (wrong sides together) and press. Your strip is now 2.5" x 45-ish" 
3. Trim off selvage edges (finished edges).
4. Open up strip.  Sew a gathering stitch along the pressed seam. Fold back into  place. 
5.  Now to cut the petals.  Scallop the open ends of the strip.  Each scallop is approximately 2.5 inches.  If you make a small mark at the open end every 2.5 inches it will help guide you as you cut.
6. At one end make what I'll call a tail.  It's about one inch wide by at least 4 inches long.  (See photo, because I'm dreadful at writing directions) 
7.  To make things easier, I then use the first one and place it on top of another strip and use it as a pattern to cut the scalloped edge.  These don't need to be "perfect."
8.  Now back to the sewing machine.  Sew the open ends (scalloped edges) together.  I like to use a contrasting thread, but you can do what ever you please.  (FYI… I was silly and still had my machine set for a gathering stitch on the photo.  I guess you could do that, but it looks better as a regular stitch.  So disregard the stitch length in the photo).
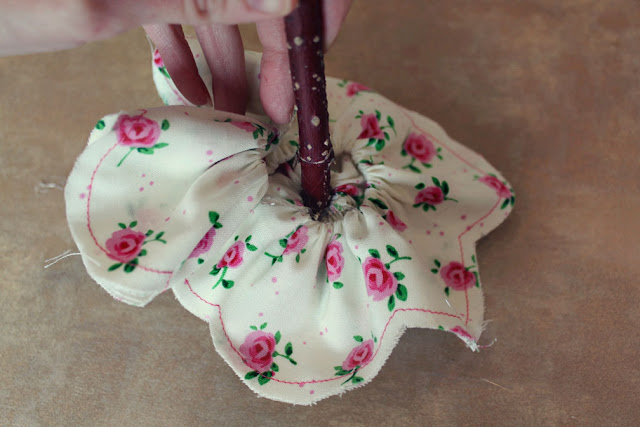
9. Now take your tail and tie it around the end of a stick.  Make sure the end of the tail is pointing upward from the stick.  (Not pointing downward). Again… see photo.
10. Now wrap the tail around the top of your stick.  As you wrap come up at a strong angle, and then down in the opposite strong angle.  This creates a "point." (Play with it before you actually glue it, so you make sure you get the right look, and so the end of the stick is completely covered). Glue in place.  And there is the center of your rose! 
11.  Now carefully gather the remaining fabric.  Be ginger with it, you don't want the string to break.  Tie the thread together once gathered. 
For a closed rose…
12.Have your glue gun handy.  Add small dab of glue  on stick and wrap the fabric around it.  Repeat until you have wrapped the entire strip of fabric around the stick.  (Try to keep the glue on the "inside" of the rose… so you don't have any showing).
For an open rose…
-Follow steps 1-11
12. With glue gun handy, add a glob of glue to the stick and wrap the fabric around the stick.  Wrap the fabric 1 to 1.5 times around. 
13.  Now with your glue gun, pull a line of glue out from the stick, onto the fabric (about 1/2 inch… it's not a perfect science).  Follow with your fabric.  Hold in in place so glue dries.  Then continue.  

 When you can see that you will have just enough to wrap the remaining fabric around the stem,  tapper your glue line in towards the stem.  Follow with the fabric.  Then glue the last of the fabric tightly against the stem.  And there is your open rose!
Lovely!  
I experimented placing my roses in two different vases.
A classic cylinder vase.  
And a long rectangle vase.  
I'm crushing on the rectangle.  I added extra sticks with fabric leaves.  Perfect for the island/workspace in my studio.  
Alright,  so once upon a time I said if I'm making one I might as well make two and have a giveaway.  It appears my offer still stands.  So I'm giving away ...
1 Dozen Long Stemmed Fabric Roses
(Vase not included... you'll have to add that yourself;)
So leave a comment to enter.  Let's see… if you don't know what to write, tell me your favorite flower.  
I'll close the giveaway on sunday, and post the winner monday.  Hooray for free stuff!

This giveaway is now closed;)
Update: I occasionally will have flowers like these for sale on etsy.
Here is a link ...
MY ETSY 
Update #2: I have a tutorial for these without the stems... for a hair clip or brooch.  Here is the link.
Roses without the stems.