Showing posts with label give-away. Show all posts

Monday, June 7, 2010

 We Have A Winner

Thanks for all of your kind comments!
To answer a couple of your questions...
a couple of you wanted to see photos of my studio.  I'd love to share it with you.  (It's my favorite room in our home...) I'm doing a couple of things to it, when I finish those up I'll post photos!
I get my fabric from all over.  These all came from JoAnn... I like their prices, but there are times I walk away empty handed.  I lucked out on my last trip.
Now for the giveaway...
I love giving something away.  It's so fun. I always wish I could give one to everyone.  Truly!!! I had so many sweet comments.  I love hearing from familiar folks, and new viewers.  Each comment just means the world to me.  So thank you! 
I left it up to the random generator.  
And so the winner of... 
1 Dozen Long Stemmed Fabric Roses is...
number 27!
Who is...
Natali Thompson
Congrats miss Nat... I'll be contacting you shortly.
I have a couple of things in the works.  So hopefully another giveaway is in the near future!
Love to you all!

Tuesday, June 1, 2010

 Long Stemmed Fabric Flowers

So the last few weeks have been overwhelmingly filled with busyness.  And this week is no exception.   Criminently this time of year always about does me in. 

However I thought I'd pause and blog a little tutorial.  All of the fabric flowers out in blog land just kill me.  They are all so fabulous.  I wanted to add a bit of fabric flower goodness to my studio.  I've had these on the brain for quite some time and I finally got around to creating them.  I think spring inspired me.   So here's how they turned out…
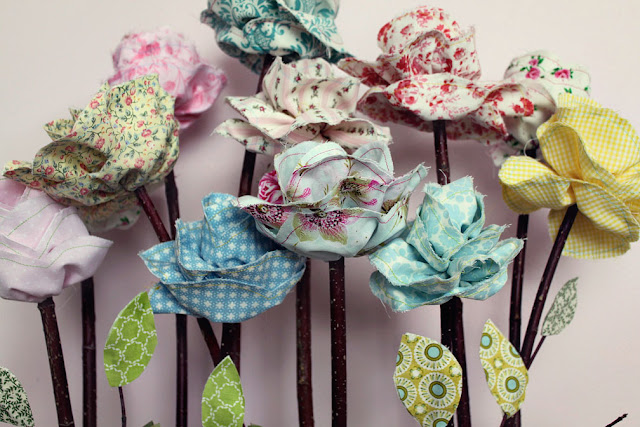
1 dozen long stemmed fabric roses!
Now my studio is wearing a smile.  Now If only I could keep it clean. Hmmm….

So here is how I made them.
1. Cut fabric (selvage to selvage) in 5" strips.  (approximately 5"x 45" long strips).
2. Fold strips in half lengthwise (wrong sides together) and press. Your strip is now 2.5" x 45-ish" 
3. Trim off selvage edges (finished edges).
4. Open up strip.  Sew a gathering stitch along the pressed seam. Fold back into  place. 
5.  Now to cut the petals.  Scallop the open ends of the strip.  Each scallop is approximately 2.5 inches.  If you make a small mark at the open end every 2.5 inches it will help guide you as you cut.
6. At one end make what I'll call a tail.  It's about one inch wide by at least 4 inches long.  (See photo, because I'm dreadful at writing directions) 
7.  To make things easier, I then use the first one and place it on top of another strip and use it as a pattern to cut the scalloped edge.  These don't need to be "perfect."
8.  Now back to the sewing machine.  Sew the open ends (scalloped edges) together.  I like to use a contrasting thread, but you can do what ever you please.  (FYI… I was silly and still had my machine set for a gathering stitch on the photo.  I guess you could do that, but it looks better as a regular stitch.  So disregard the stitch length in the photo).
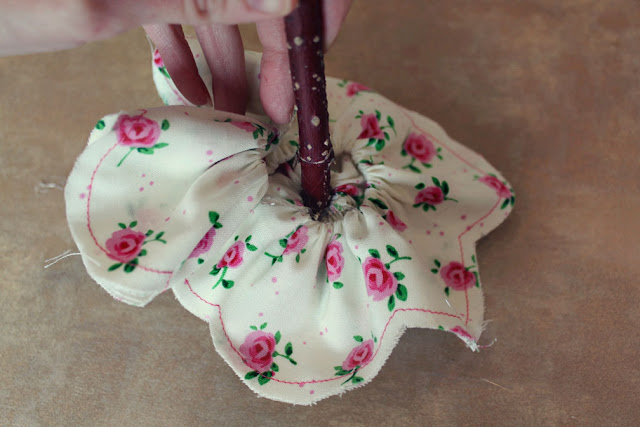
9. Now take your tail and tie it around the end of a stick.  Make sure the end of the tail is pointing upward from the stick.  (Not pointing downward). Again… see photo.
10. Now wrap the tail around the top of your stick.  As you wrap come up at a strong angle, and then down in the opposite strong angle.  This creates a "point." (Play with it before you actually glue it, so you make sure you get the right look, and so the end of the stick is completely covered). Glue in place.  And there is the center of your rose! 
11.  Now carefully gather the remaining fabric.  Be ginger with it, you don't want the string to break.  Tie the thread together once gathered. 
For a closed rose…
12.Have your glue gun handy.  Add small dab of glue  on stick and wrap the fabric around it.  Repeat until you have wrapped the entire strip of fabric around the stick.  (Try to keep the glue on the "inside" of the rose… so you don't have any showing).
For an open rose…
-Follow steps 1-11
12. With glue gun handy, add a glob of glue to the stick and wrap the fabric around the stick.  Wrap the fabric 1 to 1.5 times around. 
13.  Now with your glue gun, pull a line of glue out from the stick, onto the fabric (about 1/2 inch… it's not a perfect science).  Follow with your fabric.  Hold in in place so glue dries.  Then continue.  

 When you can see that you will have just enough to wrap the remaining fabric around the stem,  tapper your glue line in towards the stem.  Follow with the fabric.  Then glue the last of the fabric tightly against the stem.  And there is your open rose!
Lovely!  
I experimented placing my roses in two different vases.
A classic cylinder vase.  
And a long rectangle vase.  
I'm crushing on the rectangle.  I added extra sticks with fabric leaves.  Perfect for the island/workspace in my studio.  
Alright,  so once upon a time I said if I'm making one I might as well make two and have a giveaway.  It appears my offer still stands.  So I'm giving away ...
1 Dozen Long Stemmed Fabric Roses
(Vase not included... you'll have to add that yourself;)
So leave a comment to enter.  Let's see… if you don't know what to write, tell me your favorite flower.  
I'll close the giveaway on sunday, and post the winner monday.  Hooray for free stuff!

This giveaway is now closed;)
Update: I occasionally will have flowers like these for sale on etsy.
Here is a link ...
MY ETSY 
Update #2: I have a tutorial for these without the stems... for a hair clip or brooch.  Here is the link.
Roses without the stems.

Monday, March 22, 2010

 Marvelous Monday & A WINNER!

We have a winner...
Here's how it was done...
I put all names in the pretty bowl...
Scooter pulled one out. (Don't laugh but I closed my eyes, it was just too nerve-racking for me).
And the winner is...
Mobeane! 
The stars must have aligned because Mobeane's had a rough few days and could use a little pick me up.  (Her baby Maude, how lovely is that name, had a frightening situation that resulted in surgery this weekend). 
Seriously I feel like everyone I know has had a little one up at primary's this winter.
Hugs and a wreath to you my dear! 
Oh and here is what she wrote...
"I'm going to have to say Ruffles, Ruffles and more Ruffles. (But mostly because I read your other comments and Quirky seems to be what everyone else is saying and since I have this problem... serious aversion to going with the flow- it runs in the family- I'll have to say the Uber-Ruffles... and actually I think they are both amazing!) That was a really long parenthesis and I'm pretty sure there's an English teacher out there somewhere saying, tsk, tsk, tsk. Loves!"
So the rufflier conventional one is yours!
A big thank you to all who participated.  I wish I could give one to you all! (Really...I contemplated it, if only sleep wasn't vital).  I thought it was fun.... so perhaps more giveaways are in the future!  If I'm going to make one I might as well make two... what do you think? 
******************
I'm a little peculiar... I positively adore mondays.  Truly.  I feel refreshed and energized.  I've written my weekly plans and I'm all geared up.  And spring... dear dear spring...it enhances my motivation.  
Here's a little video to start your week.  It makes my heart smile.
(I've watched this oodles of times and still love it).
Enjoy...

It's a new week... make it marvelous!

Wednesday, March 17, 2010

 Feeling Lucky? It's a give away!!!

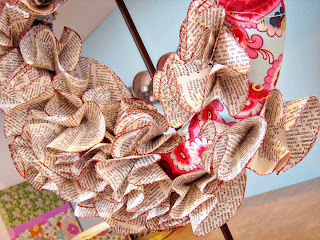
After making all those fun pom poms for valentines I wanted to attempt one as a wreath.  The timing is perfect because I was hoping to add a few additional inexpensive accents to my easter decor.  Here's how they turned out.
I made two.  I couldn't decide whether to go with conventional (ruffles all the way around) or go with something a wee-bit quirky (inspired by these divine shirts by Eliza and Axle). 
Now that they're done I can't decide which one I like more.  This works out to someones benefit... because now I have one to give away.  Yup... my first (and possibly only) give away.  Entering is easy...simply comment which wreath you dig more, (conventional or quirky) and you're entered.  Woo hoo!
And it gets better... your chances of winning are super dooper high!  I've only got a handful of readers.  So really... what's to lose?
So here's how I made them...
Let's start with the "conventional" style.
I cut about 65 six inch circles out of an old dictionary.
I slid the edge, all the way around, through a small puddle of glue.

Pour glitter on top.  Turn the circle around to coat. Add glitter as needed.
Flip over circle and glitter the opposite side.
When pouring the glitter on the circle, do it over a large sheet of paper (you could use tracing paper, wrapping paper, mailing paper, I used drawing paper... just make sure it's big enough to catch all your left over glitter).  Crease the paper down the middle.  Then you can easily pour the excess glitter back into the container.
I used martha stewart rose quartz glitter (from Michaels) for this project.
After a circle is glittered, hang it to dry.  I used clothes pins and string.
Once dry pinch the circle in the middle.  Then just keep folding it in.  Then staple it at the base.  Voila!
Continue with each circle
Then prep your wreath form.  I used a 12 inch round styrofoam form ($4.50 at Hobby Lobby and JoAnns) Wrap it in strips of the dictionary paper. I just used the glue gun and stuck it on.  No need to be perfect.  You aren't going to see much of it.
Then start adding your ruffled circles.  I would put a couple on the outside and inside and then fill up the middle.  Then start over...a couple on the outside a few on the inside and then fill it up in between.  I again used the glue gun.  Occasionally I'd add a staple from my staple gun for extra security.  Especially the outside ruffles.  Make sure you hold each ruffle in place until the glue has cooled enough to stick to the wreath. 
(Here's what the back looks like).
Then add what ever ribbon you want to hand it with.  I use ripped strips of leftover fabric and ribbon.  I tie it all in a knot at one end and glue and staple it on.  And you're done! 
Now for the quirky one...
It's basically the same.  Instead of just 6 inch circles.  I made some 6", some 5" and some 4".  I think I used about a total of 30 circles. Glitter them the same way.
I covered this wreath form in strips of torn fabric.  I started with gluing one end on what would be the backside of the wreath.  I added a couple staples for security.  Then I wrapped it... pretty tight so it would smooth out.  I only added glue to the backside... I was worried it might make it lumpy on the front.  After I glued, I'd pull it fairly tight again and wrap again...glue then wrap...glue then wrap. Add a new strips of fabric as needed.  Then add your paper ruffles.  Start with the biggest.  Then add the medium circles to each end.  Then the smallest to each end.
Add ribbon to hang and your done.
I'm thinking these would look spectacular for halloween.  Black glitter, a square wreath, wide satin ribbon and a crow perched in the corner.   Gorgeous!
Alrighty... don't forget to enter.  And seriously... anyone is welcome to enter, long lost cousins, friends of friends, complete strangers, my best friend's sister's boyfriend's brother's girlfriend who heard from this guy who knows this kid who's going with the girl who... (name the movie folks;)) you get the idea.

(I'll close the contest sunday evening and announce the winner monday morning).

This giveaway is now closed:)